Segger J-Link Introduction
Segger provides a probe - J-Link - that can be used for programming and debugging. For non-commercial use Segger offers the low priced J-Link Edu probe.
Segger supports the Cortex M7 SWV interface used on OVI40 UI and offers plug-ins for MCU eclipse.
For Debug output Segger offers an two options in MCU eclipse:
- TRACESWO output as defined by CORTEX M7. This requires a dedicated pin, currently used for M3 pushbutton switch
- Segger Real Time Tracing (RTT) with outputs debug messages in high speed via SWV debug lines (CLK and SWData). No need for an additional line to printout debug messages (as is the case with TRACESWO).
The J-Link makes use of the Cortex-M feature, which allows accessing the memory via the debug interface while the target is running. How this works in general is described here.
The speed advantage of RTT - according to Segger data - is impressive:

Install J-Link Software
Debian SW Install
- Download .deb J-Link packages from http://www.segger.com/download_jlink.html
- Download J-link .deb file, open terminal and go to download folder with terminal
$ sudo dpkg -i nameofdebpackage.deb
Windows SW Install
ToDo
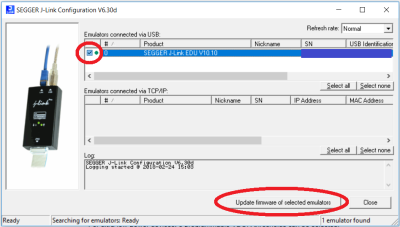
Segger J-Link adapter Firmware update
As part of the Segger J-Link SW pack the „J-Link Configurator“ utility. In Windows it can be started using the Windows start menu
Install & Configure J-Link in GNU MCU Eclipse
See here
Install Packs
For installing CMSIS packs see here
- Install the GNU MCU Eclipse Packs
- Download CMSIS packs from Keil, see
- Install local cop of STM32F7 and STM32H7
J-Link and Eclipse
- Describe Eclipse seetings (MCU, CMSIS, probe settings, …) to use J-link probe on Eclipse with uHSDR
Segger Real Time Terminal RTT
- See here
- See AN08005 (although this is for Cortex-A / Cortex-R and not the Cortex-M used by OVI40 it still gives some insights)
- is it really 100 times faster than SWO print and 10.000 times fasster than semi-hosting? Segger says here that Cortex-M supports background memory access and that RTT will have no impact on Cortex-M execution speed
RTT target code
The RTT target code is shipped as part of the J-Link Software and Documentation Pack which can be downloaded here. The RTT sources can be found in the J-Link software package under: Samples/RTT
Calling SEGGER_RTT print from within interrupts / make it re-entrant
During RTT output the functions SEGGER_RTT_LOCK() and SEGGER_RTT_UNLOCK() are called by default in RTT, but the function bodies of those functions are empty and need to be implemented according to MCU used and use case.
Please implement
- SEGGER_RTT_LOCK()
- SEGGER_RTT_UNLOCK()
- .. and disable interrupts and threads which might use RTT in SEGGER_RTT_LOCK() and enable them again in SEGGER_RTT_UNLOCK().
- See [https://mcuoneclipse.com/2014/01/26/entercritical-and-exitcritical-why-things-are-failing-badly/|here]] for a discussion on how to enable / disable interrupts on Cortex-M
J-Link support for Option bytes and Lock / Unlock
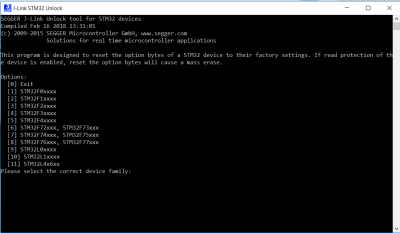
Segger provides a „STM32 unlock“ utility as part of the standard J-Link SW pack. The tool can be started in Windows using the „start“ menue and resets all values to factory default:
Note: The unlock utility resets the brown out reset (BOR) to „level 0“, equalling about 1.7 Volt.
Further reading:
- See 3.12.2 J-Link STM32 Unlock (Command line tool) in J-Link User Guide
- J-Link adapter seems to support option byte programming via J-link utility and/or J-Flash utility. This is indicated in previous versions of the J-Link or J-Flash user guides, but not in the current ones. See for example section 7.5.1.2 here
- ToDo: Verify and try out
Flashing MCU with Segger J-Link
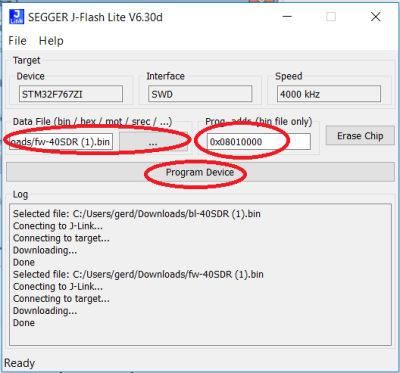
As part of the Segger J-Link SW pack the flash utility „J-Link lite“ is provided. Start J-Flash using Windows „start“ button. Note: J-Flash does not support .dfu files. Use the UHSDR .bin files. Load bootloader at address 0x08000000 and load firmware at 0x08010000.


