Pages: [1] 2 
|
 |
|
|
 Author
|
Topic: First time bootloader and firmware upload (DFU method) (Read 7446 times)
|
|
S58J
schon länger dabei

 Offline Offline
Posts: 100

Ich liebe dieses Forum!

|
 |
First time bootloader and firmware upload (DFU method)
« on: 04. September 2018, 16:18:08 »
|
|
Hi
I have populated the OVI40 UI with the minimum required components in order to transfer for the first time the Bootloader and Firmware to the MCU. After soldering all the necessary parts I have made a bridge where Band+ button is positioned, also a bridge at the P6 position and provided the 5V from mini USB (by soldering a wire between JP6 and pin 28 on JP1). No LCD yet on OVI40 UI.
There was no problem with transfering Bootloader. OVI was recognited, DFUSe ran smoothly, Bootloader transfered to MCU.
Than I wanted to use the DFUSe for transfering for the first time the Firmware as well. When I read the instructions I understood that the only difference between transfering the Bootloader for the first time and Firmware for the first time is: no P6 jumper. So I only removed P6 jumper and left Band+ bridged and of course the 5V. But now my PC does not recognize the OVI40 anymore, hence I cannot run the DFUSe and transfer the Firmware. As soon as I bridge the P6 the OVI40 is recognized normally.
What I am doing wrong? Looking forward to your reply.
73s
Janez, W4/S58J
|
|
 Logged Logged
|
|
|
|
|
|
S58J
schon länger dabei
Offline
Posts: 100
Ich liebe dieses Forum!
|
|
Re:First time bootloader and firmware upload (DFU method)
« Reply #2 on: 04. September 2018, 17:40:25 »
|
|
Thank you Andreas for quick reply.
So at this stage (with minimum parts installed and Bootloader already present) if go for your second option than all I need to do (beside what is already done: Band+ button bridged, 5V on pin 28) is to bridge the jumper JP17 and proceed as before but this time with firmware file. Am I right?
73s
Janez, W4/S58J
|
|
Logged
|
|
|
|
|
|
S58J
schon länger dabei
Offline
Posts: 100
Ich liebe dieses Forum!
|
|
Re:First time bootloader and firmware upload (DFU method)
« Reply #4 on: 04. September 2018, 22:15:04 »
|
|
Hi Andreas
Maybe we are running circles around each other but in the end talking about the same thing. Let me repeat the situation:
- It is all about DFU method for the FIRST TIME bootloader and firmware instalation.
- No LCD installed, just MCU with minimum components (first page of the UI schematics).
- Bootloader installed sucessfully following your instructions on Wiki.
- Band+ button soldering pads remain bridged (simulating Band+ "press and hold").
- Power (5V) comes from mini-USB by a wire connected between the JP6 and pin 28 on JP1.
According to your last reply that should work for the first time Firmware instalation but it doesn't. Since I removed the P6 the PC does NOT recognize OVI40 anymore. If I put P6 back, voila, OVI40 is normally recognized by computer.
Then I also tried by bridging JP17 (simulating Power button "press and hold"). Of course in addition to already bridged Band+ and supplied 5V. No change, OVI40 still not recognized.
Actually since bootloader is already installed I could go on assembling the rest of the parts and do the first time Firmware instalation via USB stick when all is assembled. What I am afraid of is that something ain't right at this moment and it will not change when OVI40 UI is complete. Plus it feels better to continue assembling by knowing that the "brains" are already in place.
By checking (and rechecking) your instructions I noticed another thing. At several points it is stressed that when using DFUSe programe the user must press the UPGRADE button (also for first time firmware install), but on this page https://www.amateurfunk-sulingen.de/wiki/doku.php?id=en:uhsdr:uhsdrfw (check the procedure under the DfuSe Firmware Upgrade) it is stated to press two different buttons: UPLOAD followed by VERIFY button. Is that correct?
Sorry to keep you on this one, I know you are very busy by doing a great job for all of us. Maybe someone else could step-in as well.
Looking forward to any reply.
73s
Janez, W4/S58J
|
|
Logged
|
|
|
|
DB4PLE
positron
Urgestein
Offline
Posts: 1278
|
|
Re:First time bootloader and firmware upload (DFU method)
« Reply #5 on: 05. September 2018, 05:14:51 »
|
|
Hi Janez,
the bootloader requires you to release Band+ before it starts the DFU.
So the sequence is:
1. Press Band+ and keep it pressed.
2. Press Power
3. Wait for the bootloader to tell you to release Band+ while keeping Power pressed
4. Now you release Band+ and the DFU mode will be activated.
Your problem is, that you have soldered Band+ closed. It will never work this way. If you already had a display, you would see the instructions as we show them.
You need to solder a switch to Band+ (or wires to simulate one).
EDIT: Sidenote: Yes, the OVI40 wiki link you mentioned says "Upload" where it should say "Upgrade". However, the UHSDR wiki in GitHub links to a document with the correct information on that. For that reason I am not too happy with the OVI40 wiki replicating information which is already present in the UHSDR wiki, this makes it more painful to keep it consistent (double work for no real gain). They should simply link to the UHSDR wiki information if already present or add it in the UHSDR wiki if applicable for more than the OVI40. EDITEDIT: At least the issue in the OVI40 wiki is consistent across the different languages maintained: Even the german document says "Upload" where it should say "Upgrade".
73
Danilo
|
| « Last Edit: 05. September 2018, 05:37:57 by DB4PLE » |
Logged
|
|
|
|
peter_77
Urgestein
Offline
Posts: 735

THE mcHF and UHSDR forum !

|
|
Re:First time bootloader and firmware upload (DFU method)
« Reply #6 on: 05. September 2018, 14:00:17 »
|
|
But... if, as you wrote, your UI is completely naked, which means nothing ever installed before, than P6 is of course mandatory. Otherwise you cannot go into DFU mode.
Maybe with an ST-Link adapter and other tools which a have'nt done so far.
If you are in DFU mode (P6 set and DFUse running) than it makes no sense to split up the procedures.
You can load the .dfu bootloaderfile and after that directly the firmware.dfu file.
With that you have installed bootloader and firmware in "one shot".
Remove P6 (and of course band+) and reboot.
The LED behaviour shows if the firmware is loaded correctly in case no display is installed.
After that no software is needed anymore. The USB stick is the only tool you need for an upgrade then. 
If your UI is totally "deaf" no DFU etc. it may have happened that you fu..ed up your STM32 registers. This happened to a bunch of people including myself here as well:
https://www.amateurfunk-sulingen.de/forum/index.php?board=15;action=display;threadid=577;start=315 (unfortunately German  ) )
You need to have a cheap ST-Link Adapter in this case and restore the register settings as Andreas posted here:
https://www.amateurfunk-sulingen.de/forum/index.php?board=15;action=display;threadid=577;start=285
After that DFU mode is restored and you can flash bootloader and firmware again with the DFUse Tool.
|
| « Last Edit: 05. September 2018, 14:49:43 by peter_77 » |
Logged
|
|
|
|
S58J
schon länger dabei
Offline
Posts: 100
Ich liebe dieses Forum!
|
|
Re:First time bootloader and firmware upload (DFU method)
« Reply #7 on: 06. September 2018, 01:49:03 »
|
|
Thank you Peter, Danilo and Andreas
I can confirm that the method proposed by Peter works like a charm: transferring both bootloader AND firmware with the use of P6 method! By installing only MCU and necessary parts around it, uploading it, testing it and continue soldering by knowing that the heart and brains are working is a priceless feeling for every constructor.
This simplicity proves that UHSDR is not only great software but also the simplest one to install. Same procedure works also if you install your UHSDR to any of the mcHF. I tested it also with my mcHF rev 0.7, so yes you are safe to do it. I wouldn't even try to do the same to Chinese clones of course, but that is another story.
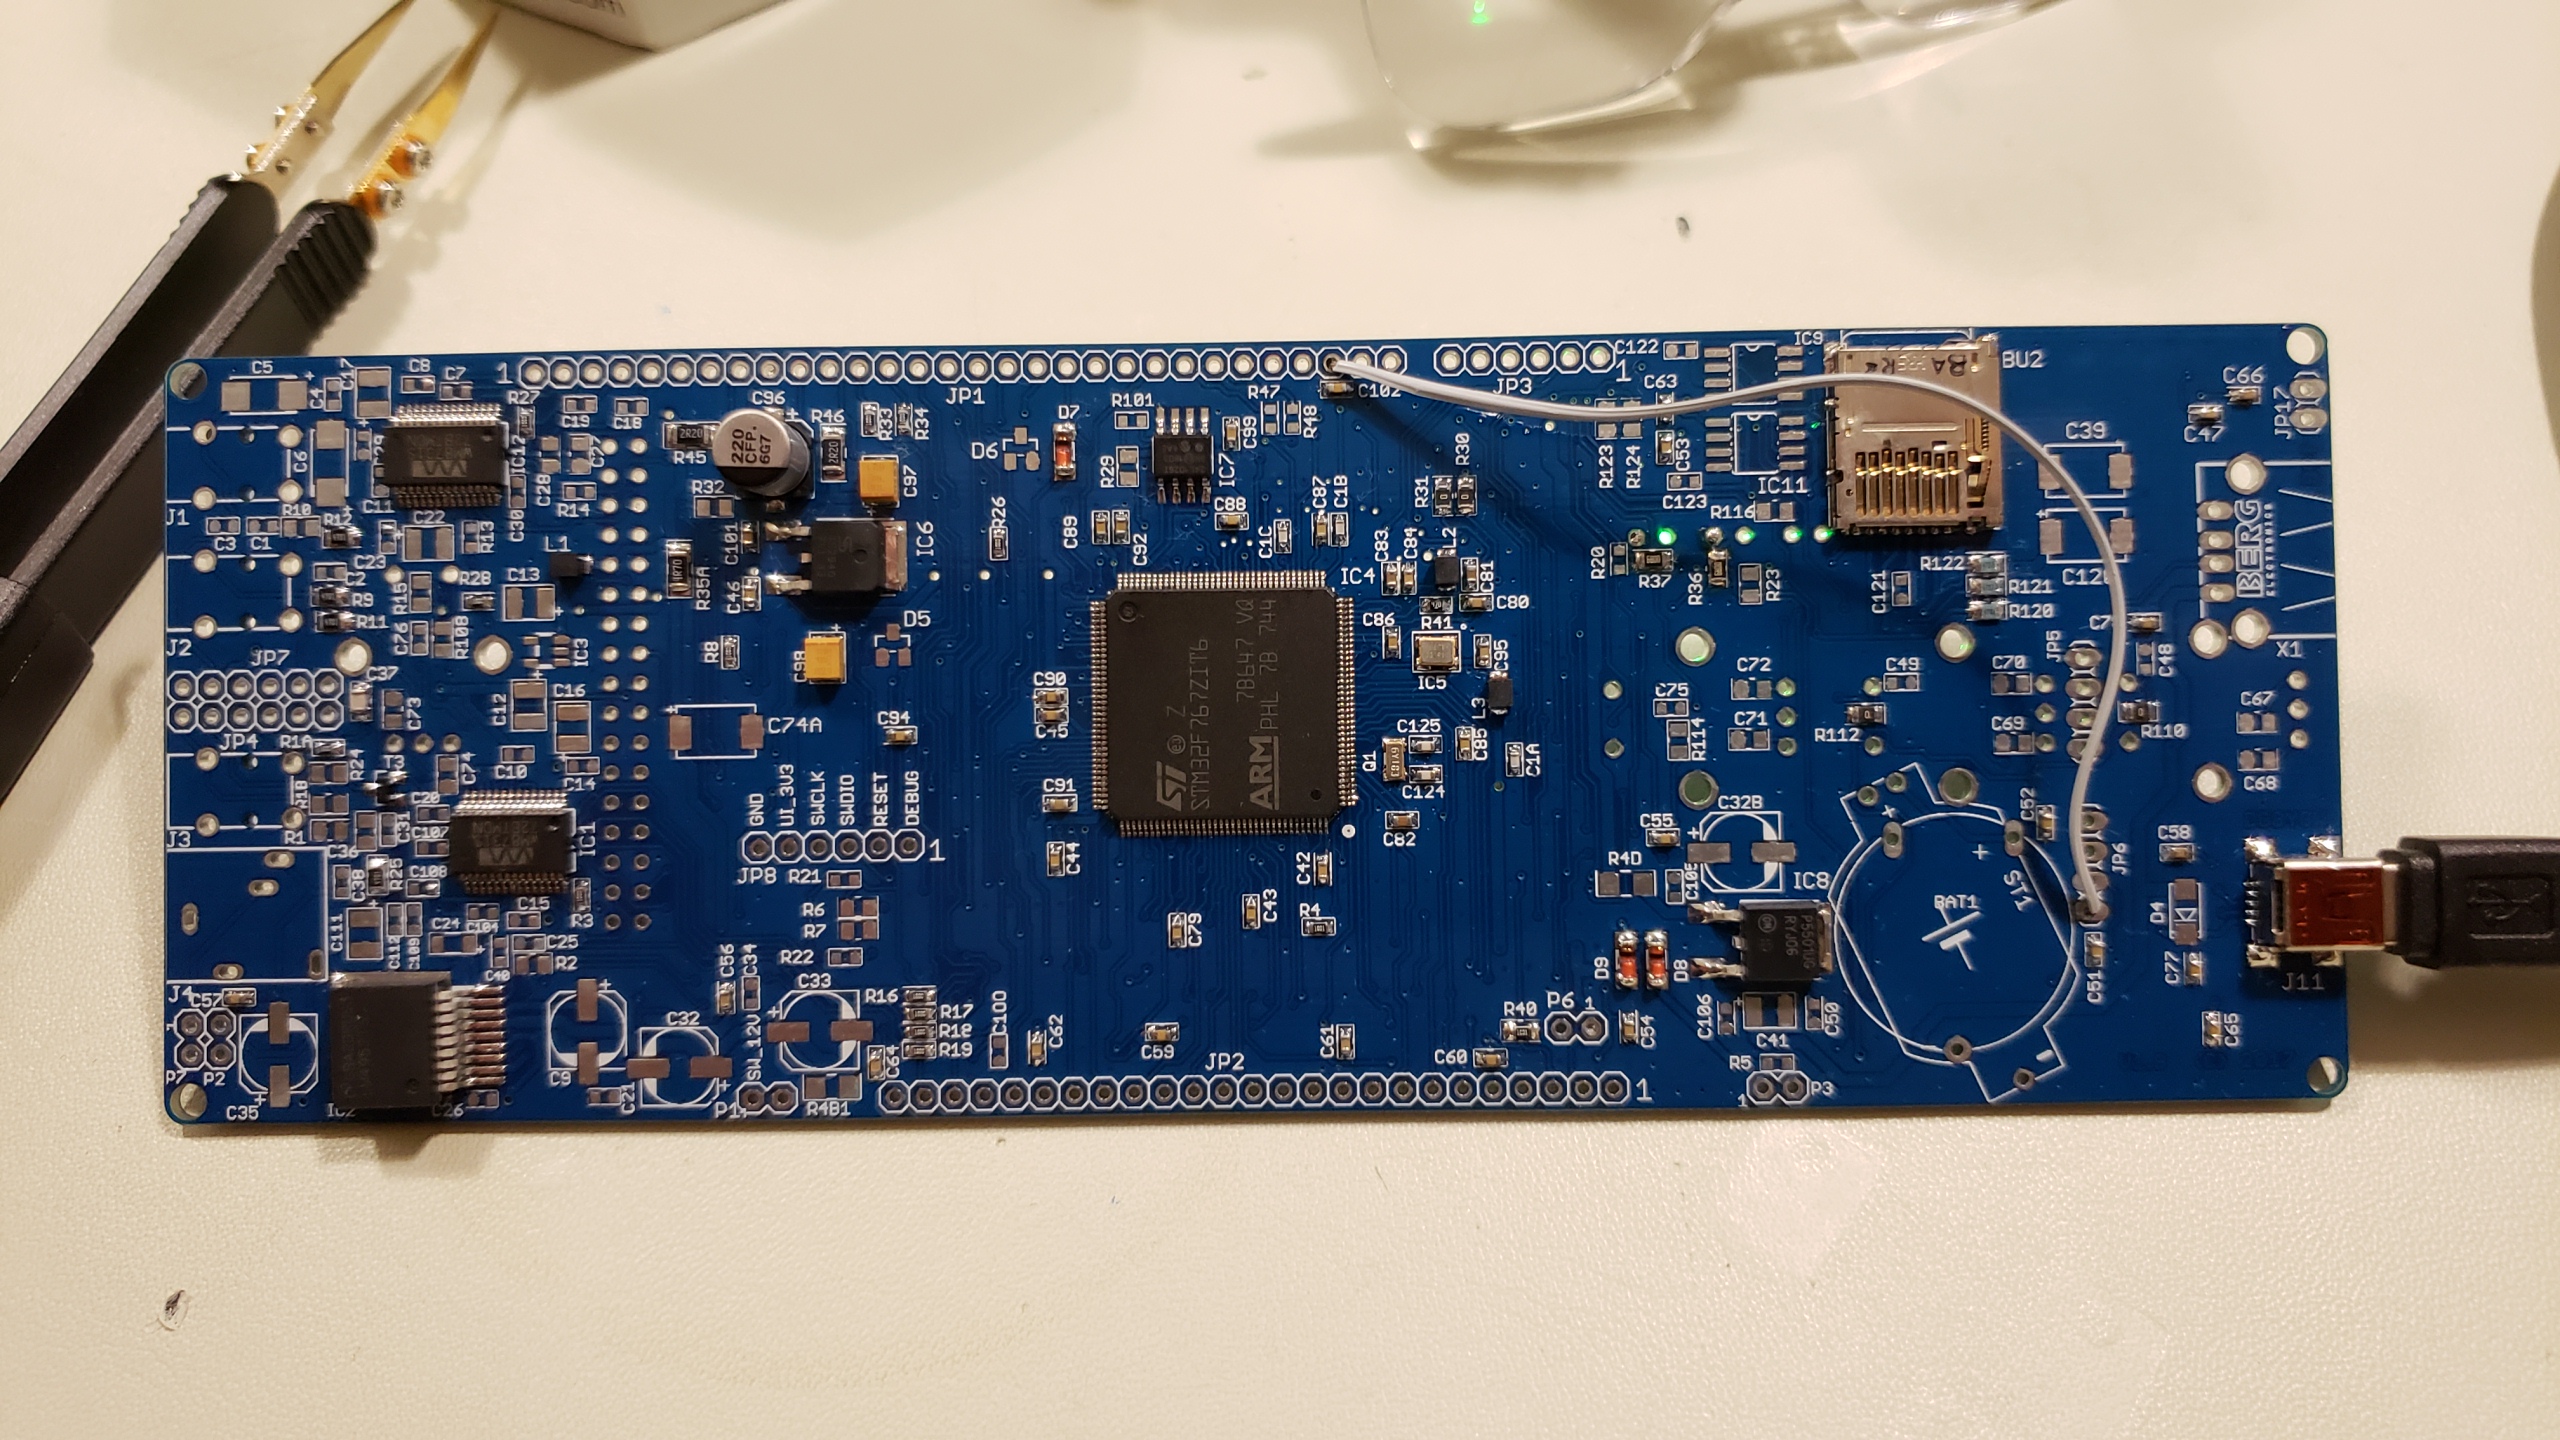
To summarize the procedure to other readers. Here I am talking about OVI40, but similar method applies to the mcHF, but be careful between the revisions (rev 0.7 has different jumper and pin layout - just follow Chris' "USB Blank CPU Programming" procedure related to bootloader installation - because the same applies to the firmware - disregard Chris' different approach to firmware installation. Back to OVI40, please follow this steps:
1. Solder MCU and the rest of the parts as they are on the first page of the schematics (you don't need IC8 5V regulator and its parts).
2. Bridge P6
3. Bridge Band+
4. Provide 5V from mini-USB by wire connecting JP6 and pin 28 on JP1 (see photo)
5. Have the DFUSe installed
6. Have your bootloader and firmware files ready (both MUST be .dfu)
7. Connect your OVI40 (mini USB) and PC (regular USB)
8. You will hear the sound of your PC recognizing your OVI40 UI (wait if it installs the driver)
9. Run DFUSe programme (as in the instructions: "UHSDR Bootloader Installation Procedure")
10. In the DFUSe on the top of the screen you must see: "STM Device in DFU Mode"
11. Start FIRST with bootloader (.dfu)
12. Press the following buttons: CHOOSE (the button at the bottom) and locate for bootloader .dfu file, mark VERIFY AFTER DOWNLOAD and as a very last press UPGRADE (NOT Upload).
13. Then I suggest to close the DFUSe programme and reopen it.
14. Again you will see "STM Device in DFU Mode".
15. Now you will install the Firmware (.dfu).
16. Repeat the steps under bullet nr. 12, but this time after CHOOSE locate your fimware .dfu file. Follow the rest of the procedure as in step 12.
17. Your MCU is programmed! It has both bootloader and firmware!
18. Close the programme
19. Remove the USB from your PC (please follow the procedure as when you remove USB stick).
20. Remove both bridges: P6 and at the Band+
21. If you want to test your MCU don't remove the wire providing 5V to pin 28.
How to test MCU:
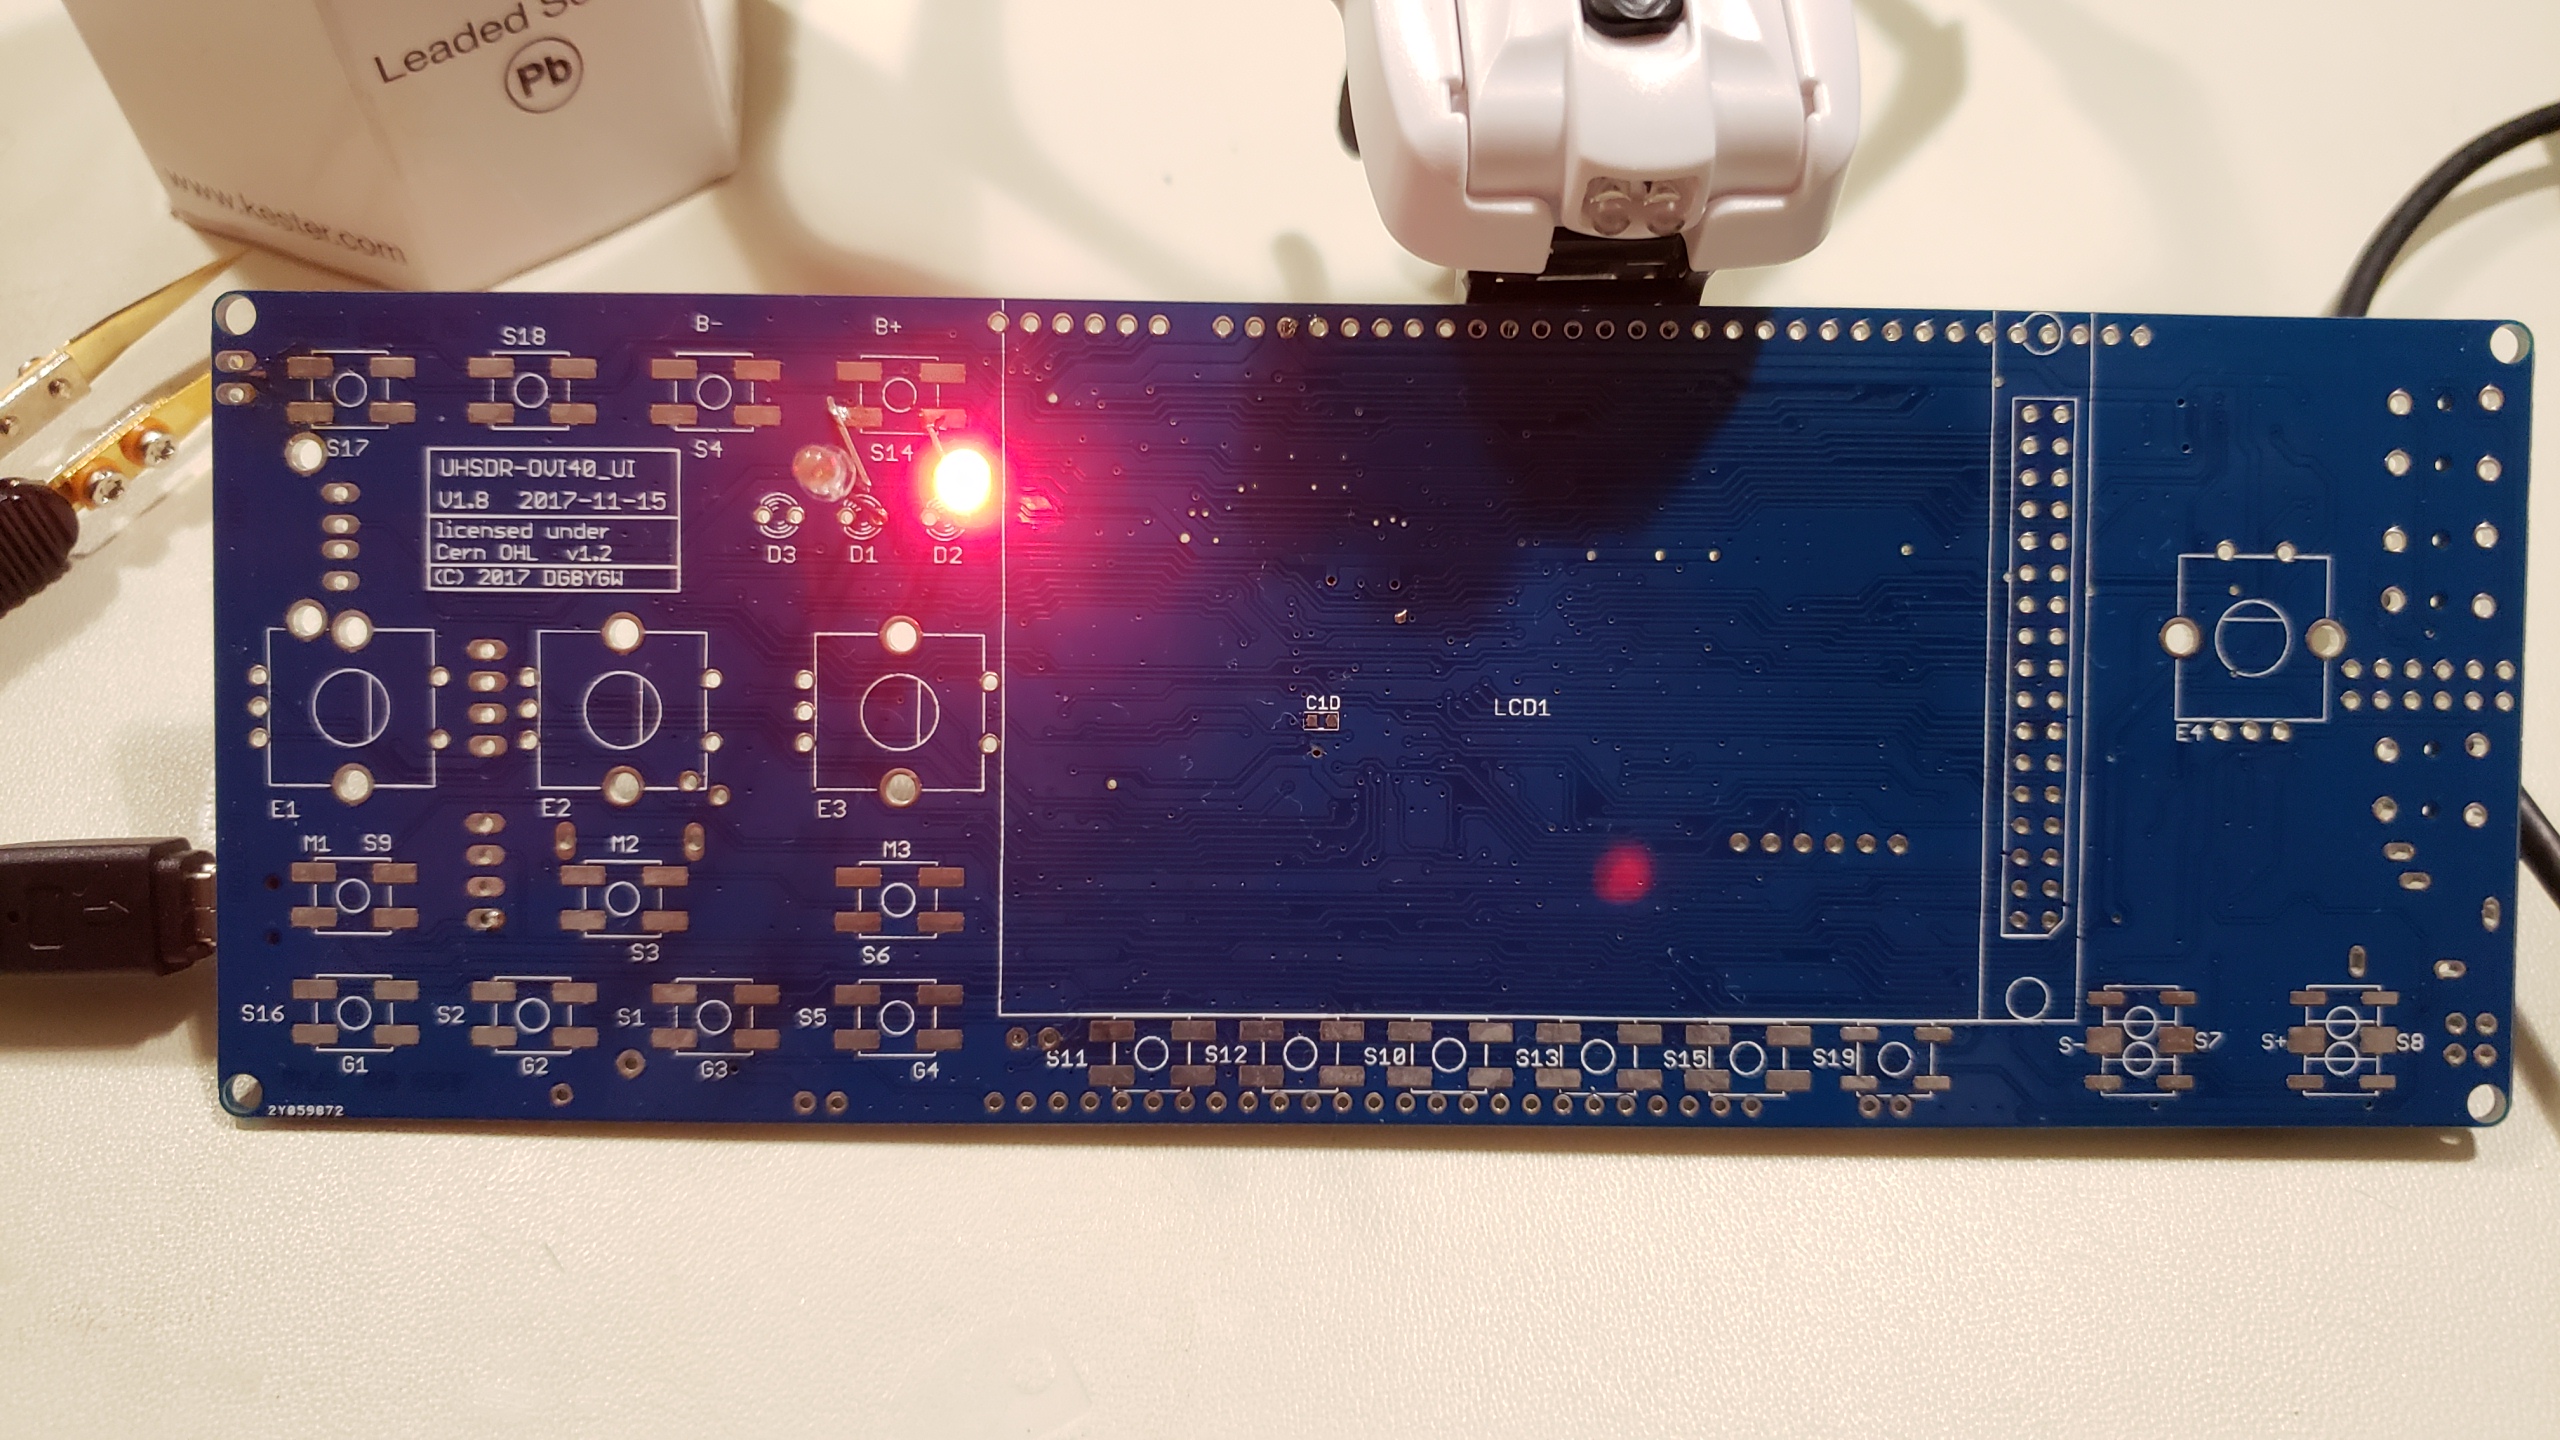
1. solder resistors R36, R37 (the ones connected to D1, D2 Led diodes).
2. solder LED1 and LED 2 (I have installed them just provisionally, because I have removed them after the test - it is easier to solder other SMD parts).
3. Again connect the mini-USB to your PC USB and enjoy the LED show!
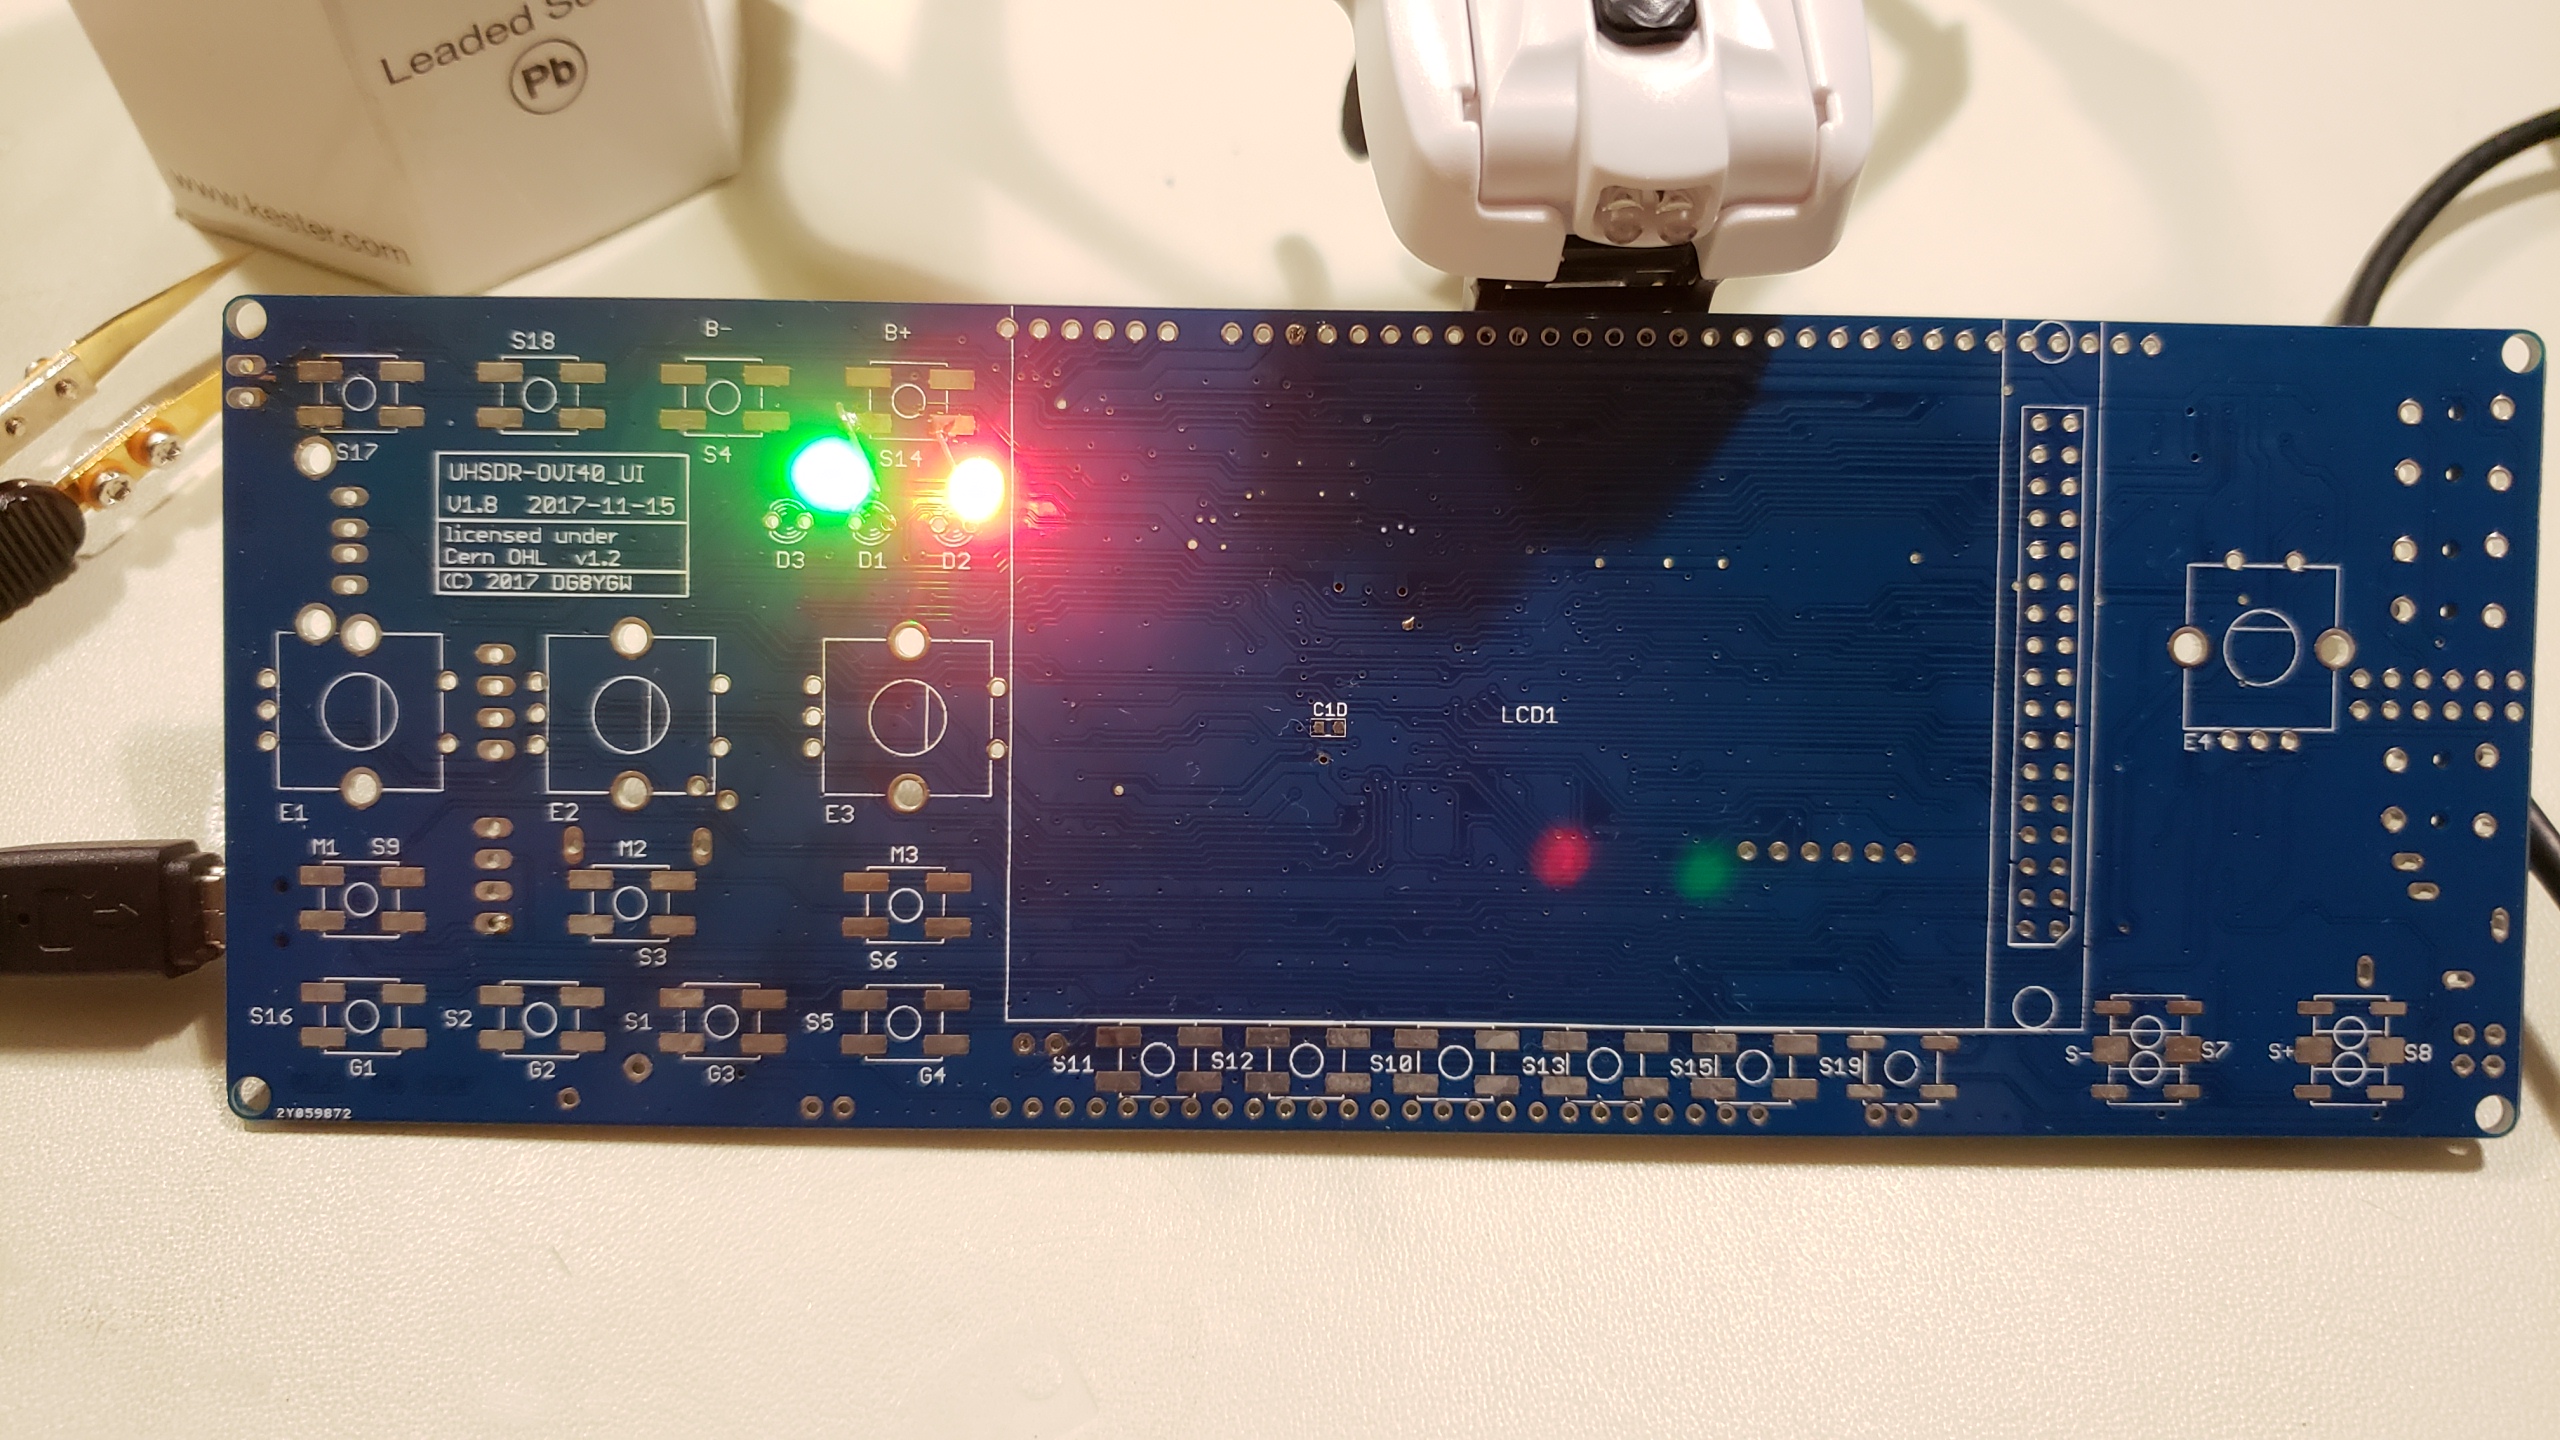
4. First you see RED led turning on.
5. Then both RED and GREEN leds are lit.
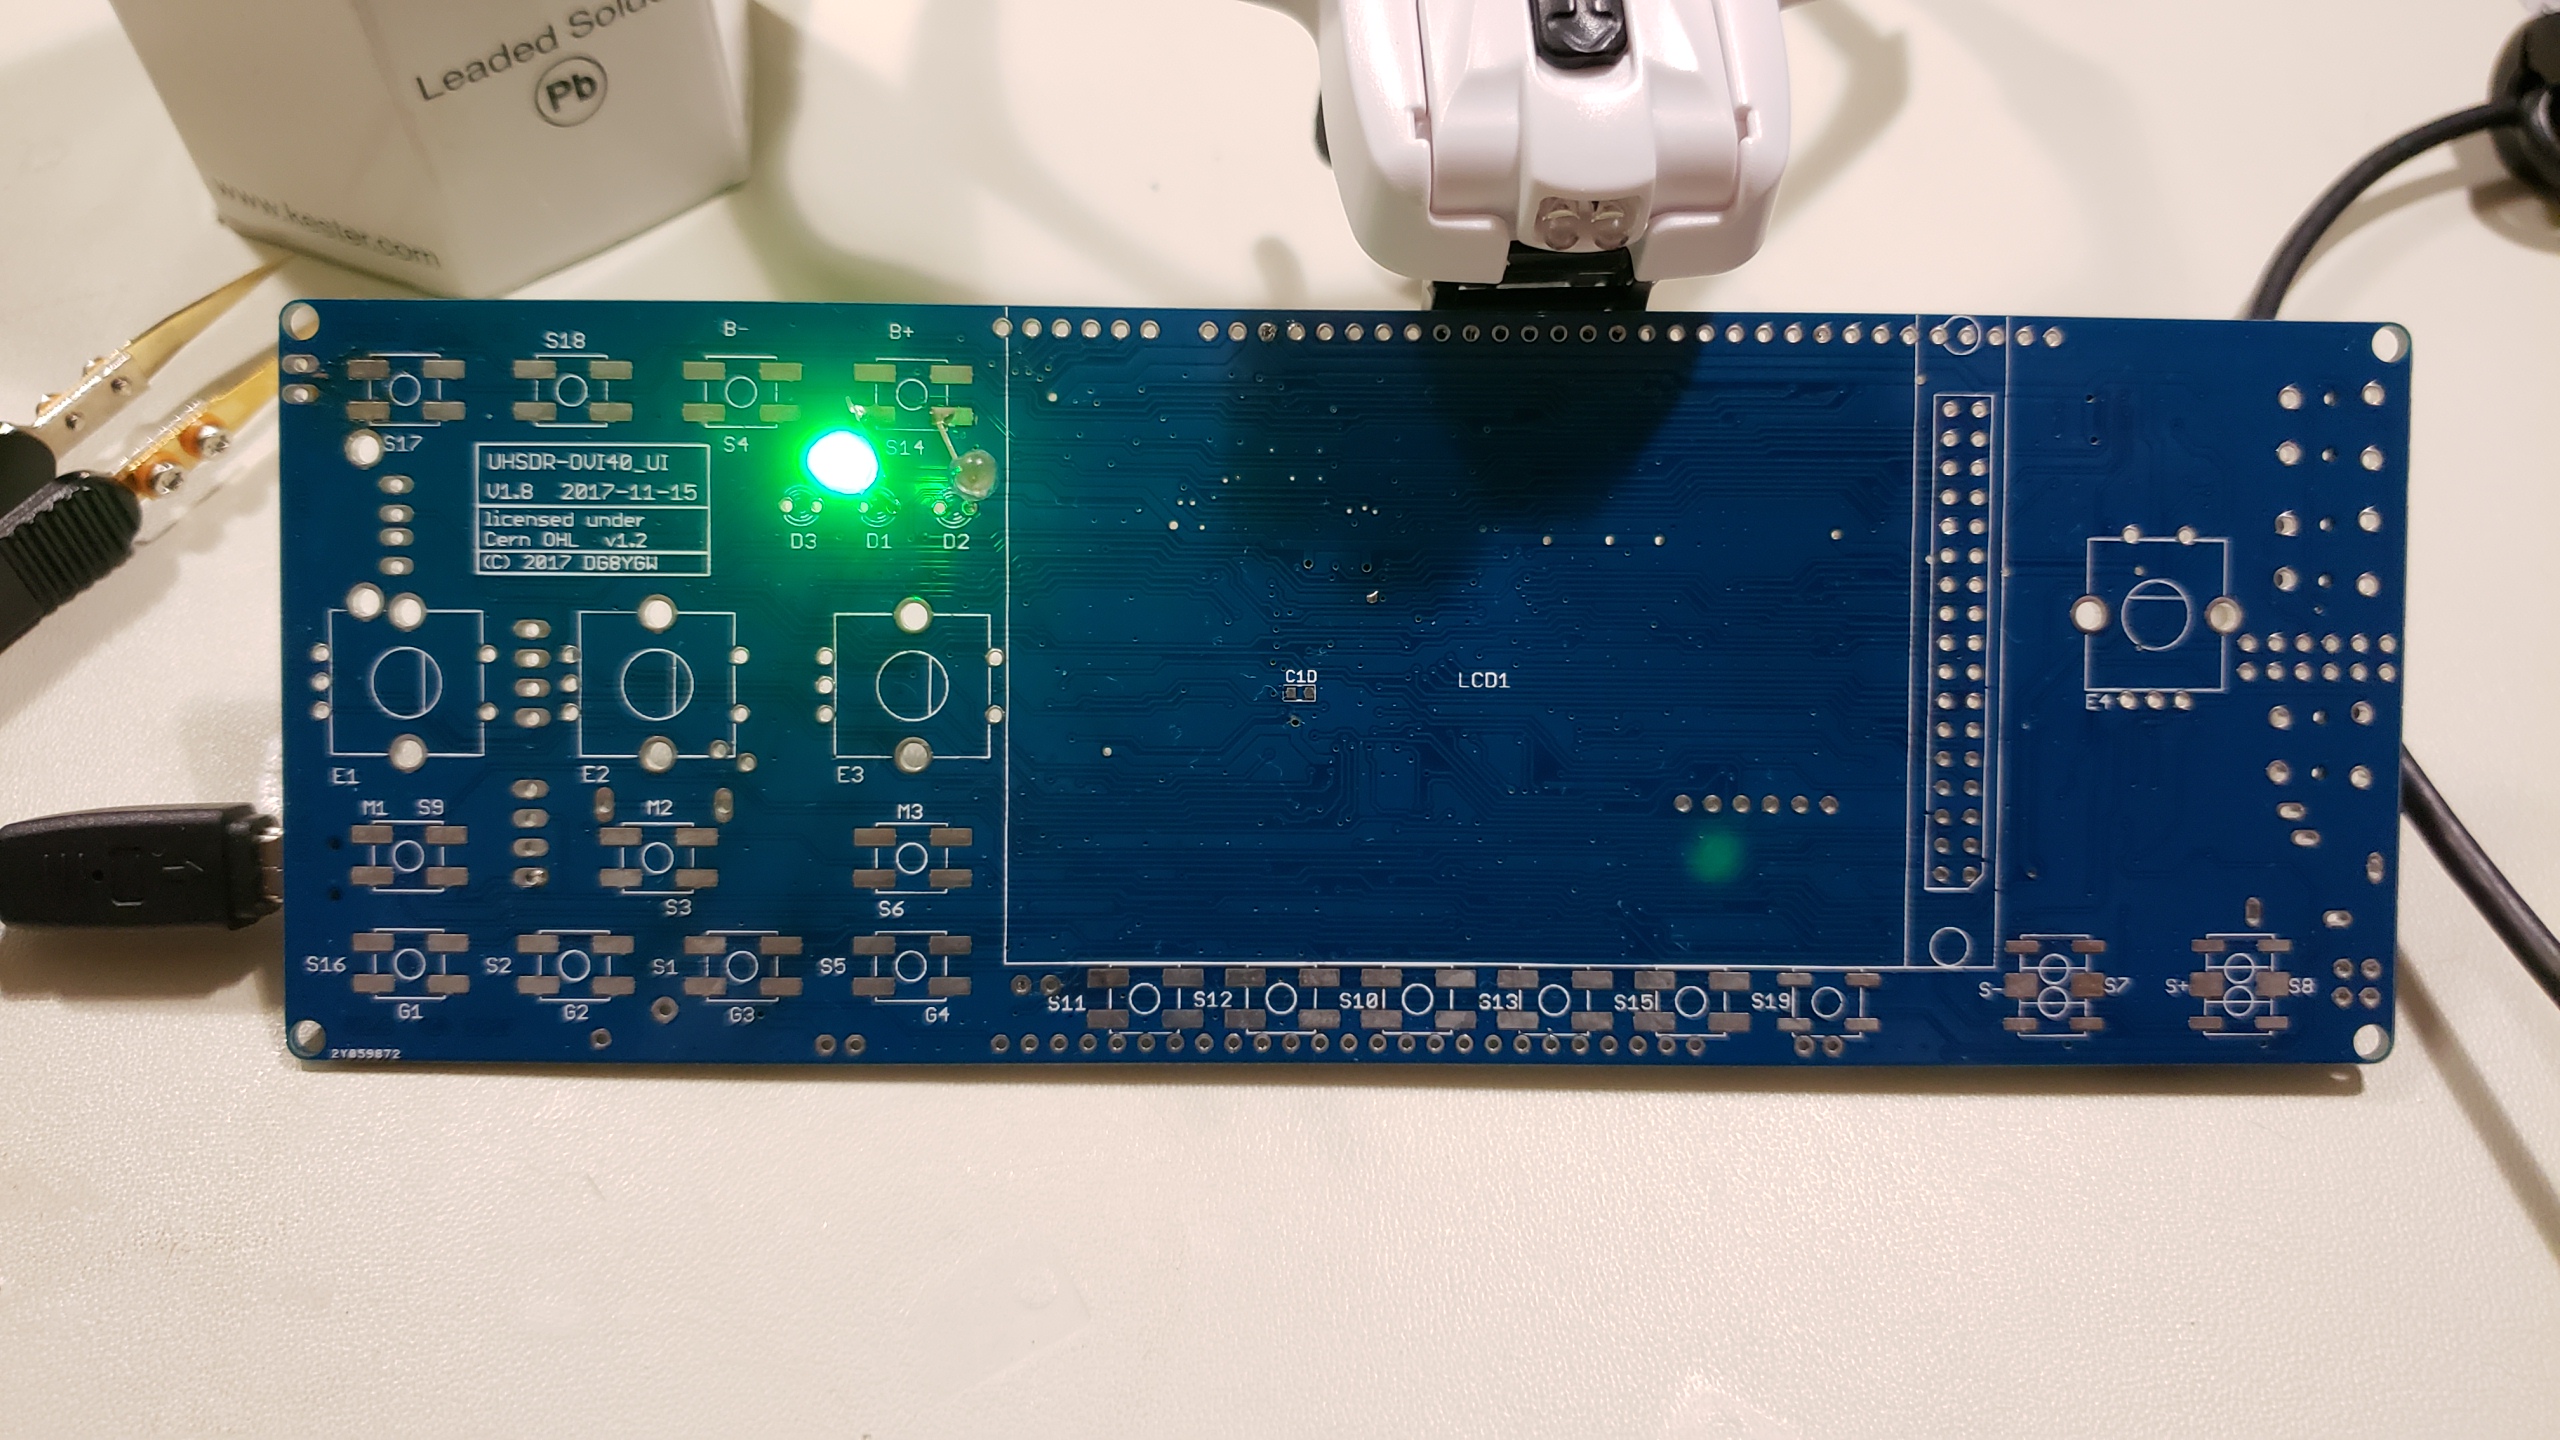
6. It takes some 10s for RED led to go off.
7. In the end just GREEN Led is lit.
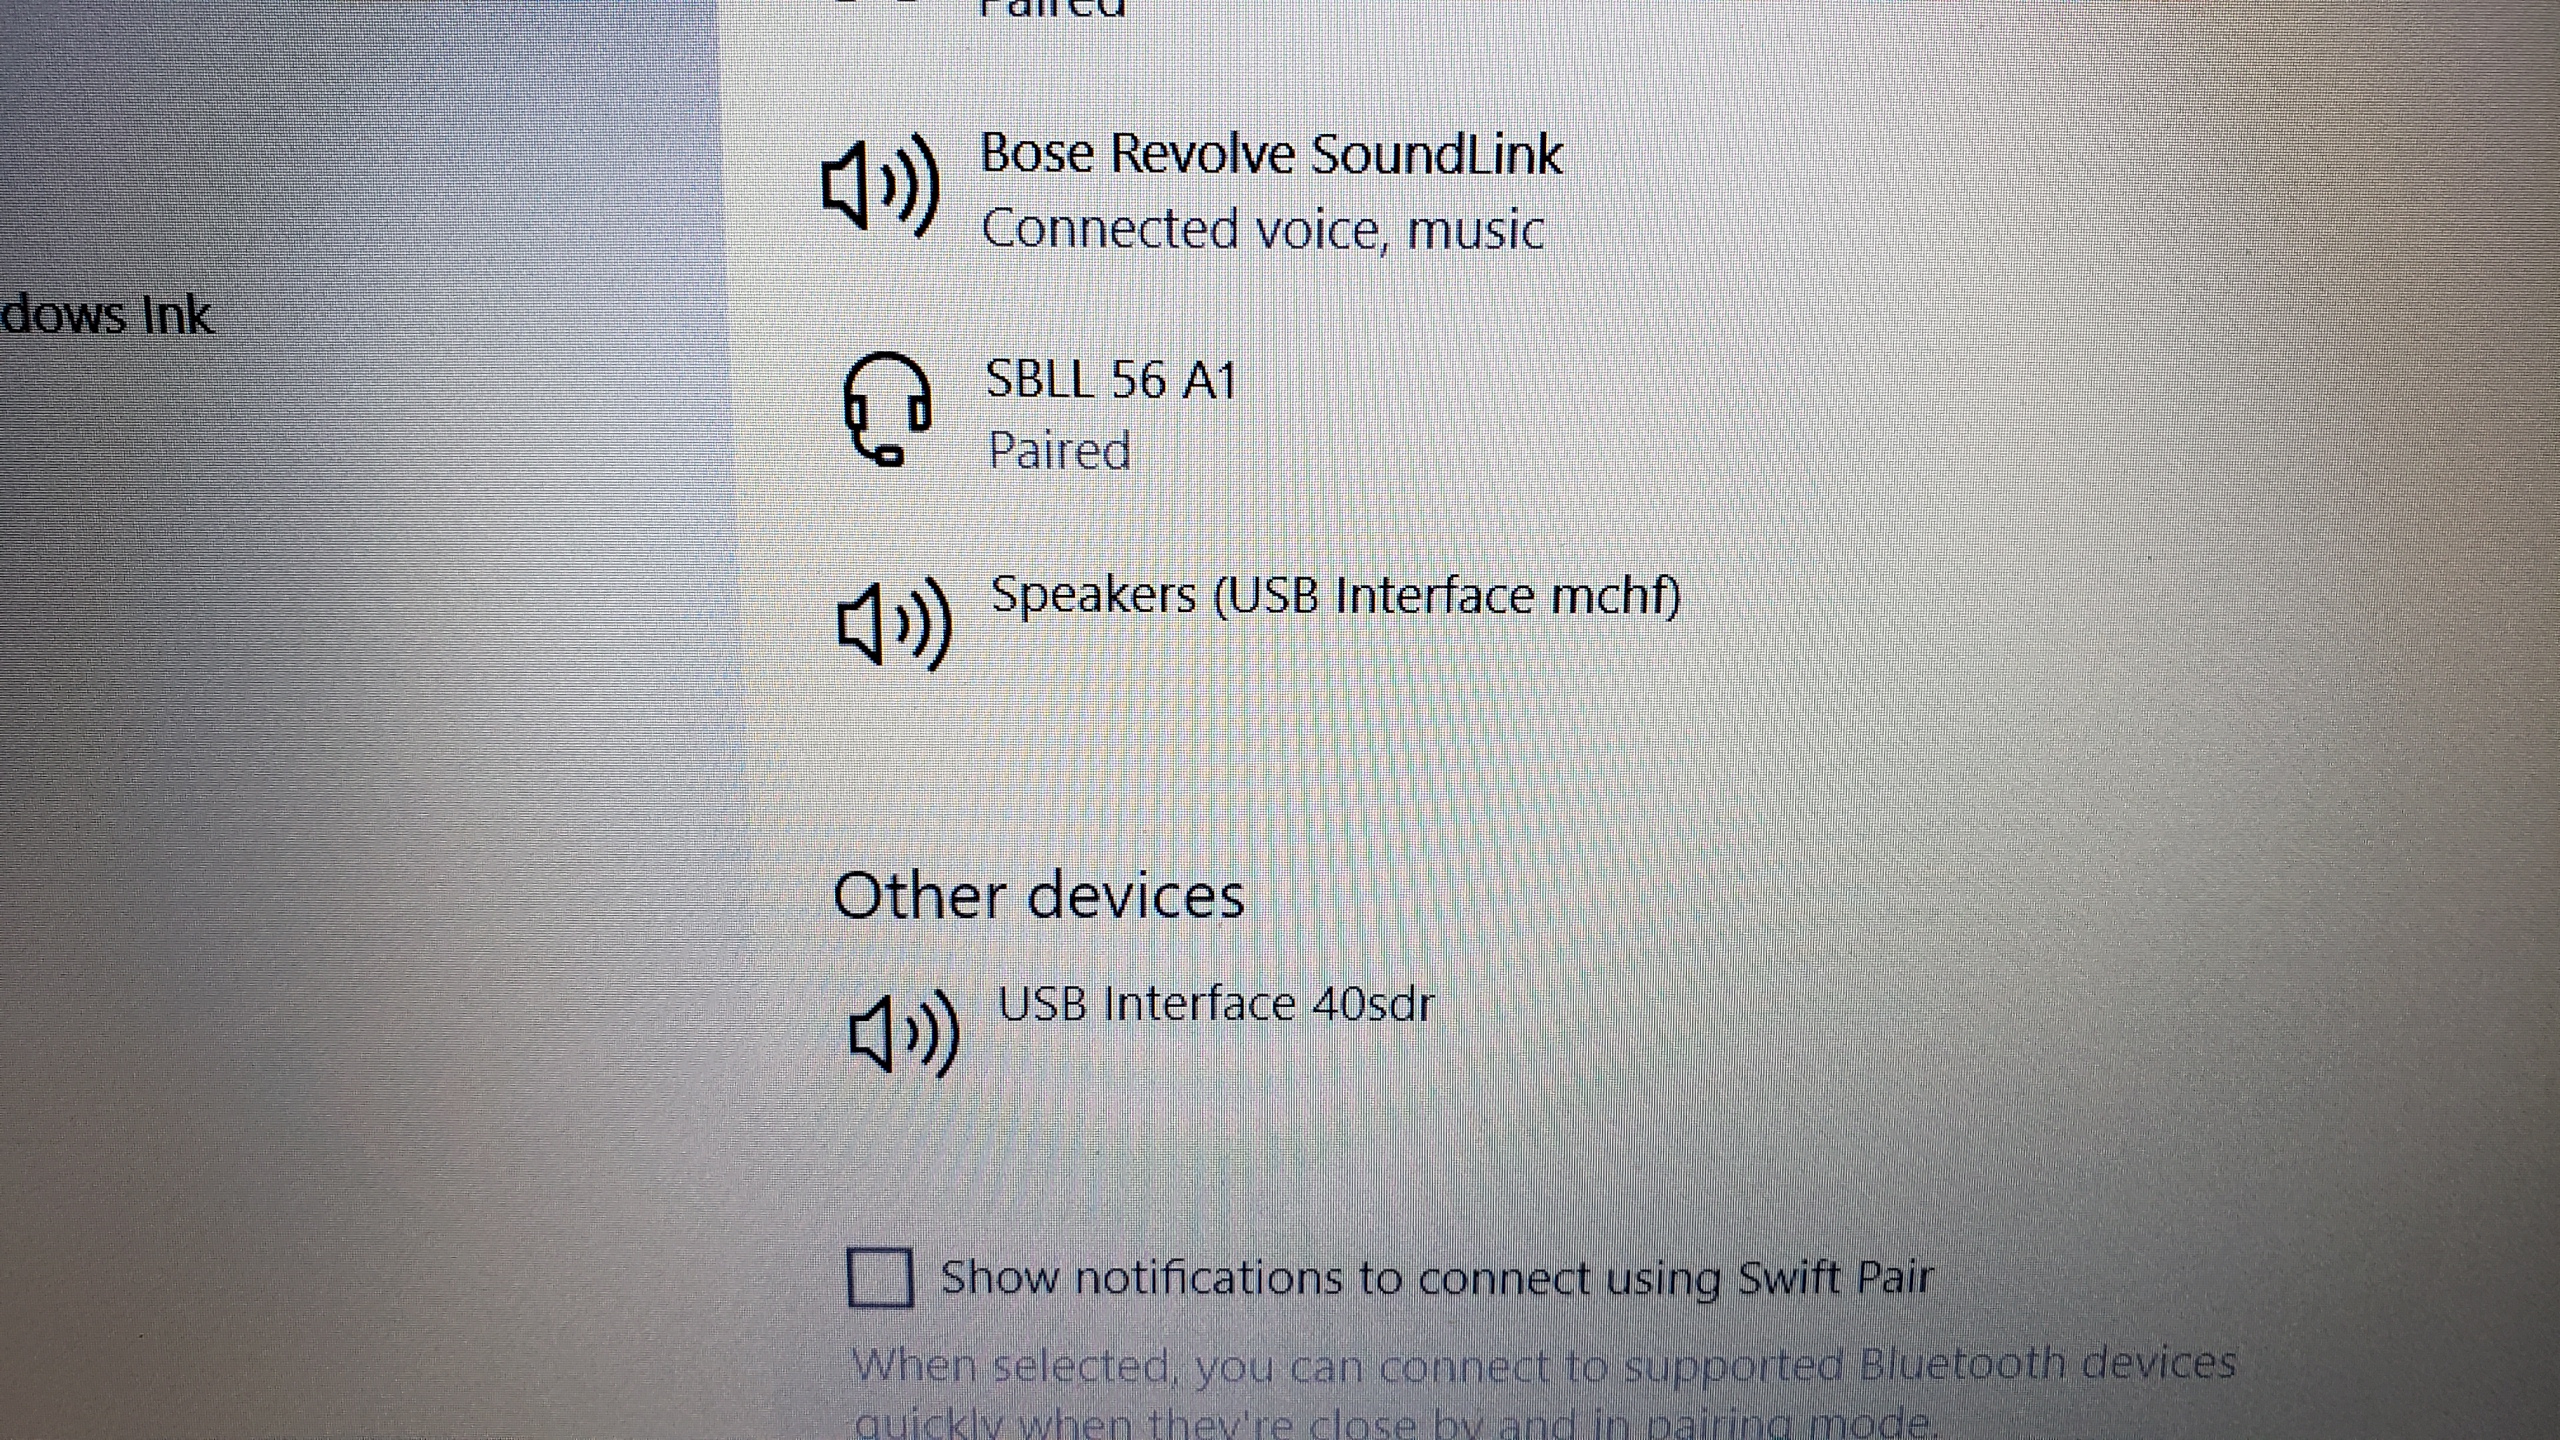
8. Check your PC and connected devices, look for "USB Interface 40SDR", and "Speakers (USB Interface mchf)". The last one might write differently on your PC since I am using the same PC to run mcHF Rev 0.7 as well and my PC sees the OVI40SDR as the same sound device.
9. Now you have visual confirmation that your MCU is functional and you can continue soldering the rest of the parts.
10. Now please do not forget to REMOVE the wire providing the 5V to pin 28 on JP1.
Some photos:
|
|
Logged
|
|
|
|
peter_77
Urgestein
Offline
Posts: 735
THE mcHF and UHSDR forum !
|
|
Re:First time bootloader and firmware upload (DFU method)
« Reply #8 on: 06. September 2018, 13:31:21 »
|
|
| I wouldn't even try to do the same to Chinese clones of course |
|
You can !
Works like a charme the same way... 
The Chinese stuff is mostly all based on ver. 0.6 of mcHF.
https://www.youtube.com/watch?v=MXfTxMnCoGE
or
https://www.youtube.com/watch?v=xhBqef6hc04
Band+ do not need to be bridged if you flash the first time. Thats a UHSDR bootloader function to bring the device into DFU mode without P6 but that works of course only after you have sucessfully flashed the bootloader. So for the "maiden" flash P6 should be just enough.
And....
Working with a Mac or Linux will not make your PC chime if USB recognized DFU Mode. It only happens unter Winblows.
The rest is perfectly fine and thanks for listening all the steps to get it work !
And... Were are the photos ?? 
|
| « Last Edit: 06. September 2018, 13:54:13 by peter_77 » |
Logged
|
|
|
|
S58J
schon länger dabei
Offline
Posts: 100
Ich liebe dieses Forum!
|
|
Re:First time bootloader and firmware upload (DFU method)
« Reply #9 on: 06. September 2018, 14:38:34 »
|
|
For the reasons unknown to me, photos were not included. I will do it one by one. So here, as promised:
|
|
|
|
S58J
schon länger dabei
Offline
Posts: 100
Ich liebe dieses Forum!
|
|
Re:First time bootloader and firmware upload (DFU method)
« Reply #10 on: 06. September 2018, 14:39:43 »
|
|
Photo nr. 2 (OVI 40SDR starting)
|
|
|
|
S58J
schon länger dabei
Offline
Posts: 100
Ich liebe dieses Forum!
|
|
Re:First time bootloader and firmware upload (DFU method)
« Reply #11 on: 06. September 2018, 14:40:42 »
|
|
Photo nr. 3 (middle step):
|
|
|
|
S58J
schon länger dabei
Offline
Posts: 100
Ich liebe dieses Forum!
|
|
Re:First time bootloader and firmware upload (DFU method)
« Reply #12 on: 06. September 2018, 14:41:45 »
|
|
OVI40 ready!
|
|
|
|
S58J
schon länger dabei
Offline
Posts: 100
Ich liebe dieses Forum!
|
|
Re:First time bootloader and firmware upload (DFU method)
« Reply #13 on: 06. September 2018, 14:42:56 »
|
|
On the view on your PC hardware settings:
|
|
|
|
NS7E
Neuling
Offline
Posts: 5
Ich liebe dieses Forum!

|
|
Re:First time bootloader and firmware upload (DFU method)
« Reply #14 on: 23. December 2020, 04:18:26 »
|
|
my ovi40 went white /gray no leds and no usb recognized in windows it had been working for
months i checked all voltages are there 8 5 3 all good ?
any sugestions ?
|
|
Logged
|
|
|
|
Pages: [1] 2 
|
|
|
|
|
|
|